
photography tips to help others
Media Cards & Backing Up
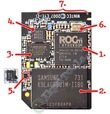
" Now that SD media cards are so cheap, I have switched from using 16GB or larger media cards, time and time again, after transfering the images to my PC and deleting them on the card. My new system is to use a new 4GB card for each trip. A 4GB card will still allow me to capture hundreds of images - then I transfer the images to my PC as before, but now I label the SD plastic box and store it in a box for possible recall of the original image. At £3.60 each now for a class 10 superfast card, it's a small price to pay for all the added benefits a brand new card gives me. If you have never seen inside an SD card (look at the image below) it's like looking in a mini computer, so just like your PC, it can have a "spazz-out" and you lose a lot of data - for £3.60 is it worth taking that risk?
My D-SLR is a Nikon D7100, which has two SD slots (the D7000 also has that too) - I put a 4GB card in slot 1 and a 64GB card in slot 2. In the menu system of the camera there are options how you wish the slots to be used - I chose to always capture the images to slot 1 and backup at the same time to slot 2. Therefore, as not every trip will I fill the 4GB card, the 64GB card is capable of backing up a complete years-worth of original images. The price now for a decent class 10 64GB on Amazon is currently just over £24, so I will purchase new 64GB cards every year and then store the previous years images. Thus I will be storing all the "original" images x2 - overkill? perhaps, but for me it works and I can sleep at night.
After losing thousands of images on a computer crash a few years ago and also experiencing an SD card failure (yes they do happen sometimes) when visiting an aquaintance who by chance was the WWII scientist responsible for degaussing submarines and Alied ships (his whole house apparently has a powerful magnetic force field around it, for whatever reason??) , I am now over careful to backup data. So after transfering my images to my special photography laptop and editing them on Lightroom (superb in many ways) and Photoshop Elements (we have excellent YouTube Tutorials on this website for both of those software packages), I backup the edited images to a Toshiba 1 Terabyte portable hard drive"
After losing thousands of images on a computer crash a few years ago and also experiencing an SD card failure (yes they do happen sometimes) when visiting an aquaintance who by chance was the WWII scientist responsible for degaussing submarines and Alied ships (his whole house apparently has a powerful magnetic force field around it, for whatever reason??) , I am now over careful to backup data. So after transfering my images to my special photography laptop and editing them on Lightroom (superb in many ways) and Photoshop Elements (we have excellent YouTube Tutorials on this website for both of those software packages), I backup the edited images to a Toshiba 1 Terabyte portable hard drive"
Camera Settings
"Unless you intend to shoot all of your images in RAW, which enables the photographer to manipulate via software every element, one needs to change some of the default settings to get the best from your camera.
Digital cameras, whether they be D-SLR's, Bridge or Compacts use an in-camera processor to enhance the taken image before saving it to the media card. Manufacturers estimate what image would best please the photographer in various situations and they construct the "Default" settings for each camera.
All the cameras that club members use, have an in-depth menu system, whereby the photographer can change the default settings to personalise his or her tastes. Most cameras come with "on-camera", rather than "in-camera", ability to vary settings that are deemed likely to be changed from one shot to another and your user manual will explain what each "on-camera" facility does.
"In-Camera" settings changes, reached via a series of menu options, can be very hard to remember where they were that you found them. Some popular setting changes, which should improve the "out-of-the-box" results are:-
Image Quality
Image Size
ISO Sensitivity
Sharpen Image
Saturate
For all Nikon D-SLR users, these can be changed via the "Shooting Menu"
Image Quality
Shooting Menu - Image Quality
Note: Basically, the higher the image quality, the best image you will take - however, the better the quality, the more storage size per image.
Image Size
Shooting Menu - Image Size
Note: The bigger the image size the better - However, as with Image Quality, there is a storage size issue.
ISO Sensitivity
There could be another "on-camera" way to change the ISO settings for shot to shot changing, however the internal method sometimes allows for an auto minimum/maximum setting to be selected.
Note: Just like in old 35mm film days, the lower the ISO number, the better the definition/saturation etc. However the following should be noted...a low ISO setting changes the metering to give a low f number (aperture) and low shutter speed so as to give the best exposure combination. Also, raising the ISO setting, although allowing for a better exposure combination, may produce "noise" on the final image.
Sharpen & Saturate Image
Changing the cameras sharpening ability whilst it processes the image, is one of those options that are easily forgotten where it is you found it.
For Nikon users, the facility is via the "Set Picture Control" in the Shooting Menu.
Select - Shooting Menu - Set Picture Control and you will be presented with the ability to choose one of the following.....Standard - Neutral - Vivid - Monochrome - Portrait - Landscape (on high-end Nikons there could be more options)
Selecting one of those options will allow you to "tweak" for .....
Quick Adjust - Sharpening - Contrast - Brightness - Saturation - Hue
by clicking the right > triangle on the selection wheel and then saving by pressing "OK" in the centre of the wheel.
Your user manual (some available on this website) will explain in more detail what each setting does.
In general, certainly for Jpeg images, setting the sharpness to 8 improves the sharpness a lot without the need to sharpen the image post production on a computer. The downside to "in-camera" menu changes is that it can, especially if you change some of the Noise Reduction, HDR etc settings, slow down the saving speed. This is not a significant factor for most photographers unless they want to take hundreds of "Burst" action shots. Shooting in RAW, which takes a greater storage space per image, also takes longer to save - shooting in jpeg and RAW together will for instance alter the "Burst" rate by 50% or more."
(c) Copyright Paul H. Simmons 2015
