
photographer's overview of how it was done
|
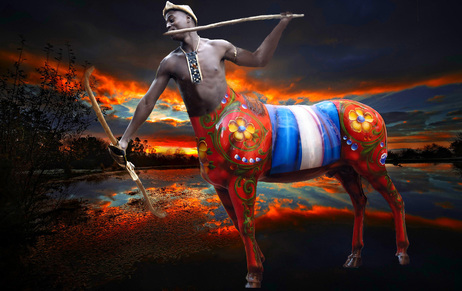
Final Image |
Please note that Lightroom 5 was not used in this process and all images used were jpegs - the total job I estimate to have taken me approx 10 to 12 hours over a period of 4 days
In Photoshop Elements 11 the following images were first loaded:
In Photoshop Elements 11 the following images were first loaded:
|
|
I use a somewhat unorthordox method - but it works for me
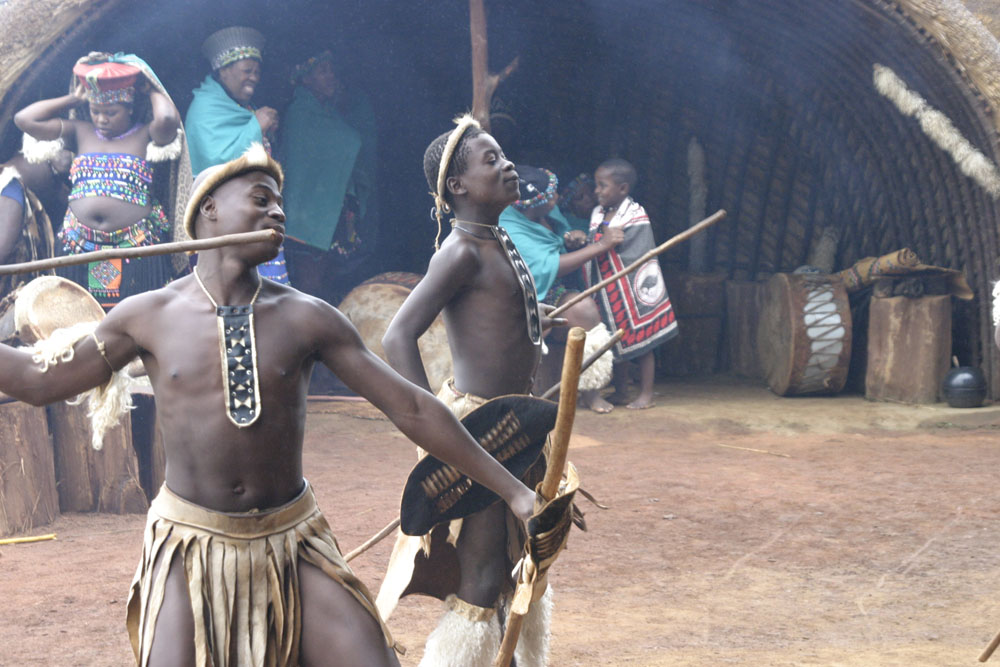
Zulu Image
1) The image of the Zulu dancer was corrected (Enhance - Adjust Lighting - Levels)
2) The image was flipped (Image - Rotate - Flip Horizontally)
3) The Background Eraser Tool was selected and a portion of the background was erased (small amount is fine)
4) The background was carefully cut around the dancer and the selection inversed (Select - Inverse - Edit - Cut)
5) The cut image now has a chequered background
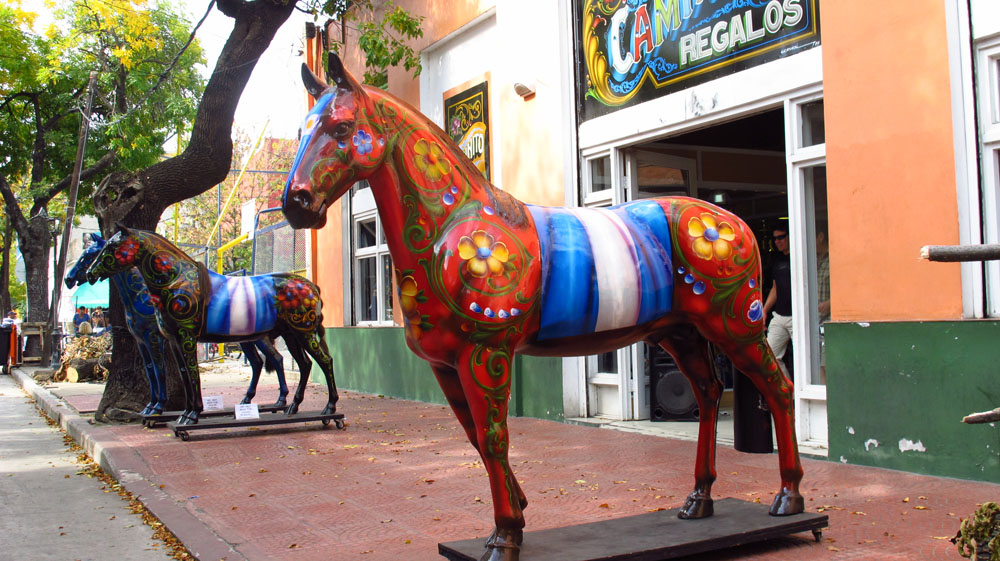
Horse Image
1) The image of the Horse was corrected (Enhance -Adjust Lighting - Levels)
Items 3) 4) & 5) above were done to the horse image
Combining Images
Make sure that the Layer window is open
1) The Zulu was copied (Select - All - Edit - Copy)
2) The Horse image was selected and the Zulu pasted into it to create a new layer (Edit - Paste)
3) Make sure the Horse layer is at the top of the stack of layers
4) Using the Lasso tool cut of the Horses head & neck (Edit - Cut)
5) Highlighting the Zulu Layer, reduce the image & rotate the man to fit into the area where the horses head & neck were
6) Use the Background eraser tool to finely discard any unwanted areas from both layers
7) When satisfied with combined images - (Layer - Flatten Image ) and save to new file
Insert New Background
1) A suitable background is opened up in PS Elements 11
2) The new combined file is opened
3) Select the combined file and copy as 1) in Combining Images
4) The new background was selected and the combined file pasted into it to create a new layer (Edit - Paste)
5) Carry out the all the tasks previously described, moving the combined file to the desired location.
6) Flatted layers as 7) above and copy to new file
Note: I then had the man's torso inside the horses trunk, however, the Zulu was missing his upper arm, elbow and hand that was obviously holding the stick. Therefore:
Editing
1) The following parts of the Zulu were created by selecting the Clone Tool to make the image more realistic
Left arm, elbow and hand
Stick was extended to the left hand
fingers were created gripping the stick
Stick was lengthened and a point created
Zulu's hat was extended upwards
Stick held in right hand was extended and made to look like a bow
Horses hoof was created
2) The background was softened or sharpened where needed
3) All edges were smoothed using the Blur Tool
4) Image was magnified greatly and "spotted"
5) All edges were cleaned
Zulu Image
1) The image of the Zulu dancer was corrected (Enhance - Adjust Lighting - Levels)
2) The image was flipped (Image - Rotate - Flip Horizontally)
3) The Background Eraser Tool was selected and a portion of the background was erased (small amount is fine)
4) The background was carefully cut around the dancer and the selection inversed (Select - Inverse - Edit - Cut)
5) The cut image now has a chequered background
Horse Image
1) The image of the Horse was corrected (Enhance -Adjust Lighting - Levels)
Items 3) 4) & 5) above were done to the horse image
Combining Images
Make sure that the Layer window is open
1) The Zulu was copied (Select - All - Edit - Copy)
2) The Horse image was selected and the Zulu pasted into it to create a new layer (Edit - Paste)
3) Make sure the Horse layer is at the top of the stack of layers
4) Using the Lasso tool cut of the Horses head & neck (Edit - Cut)
5) Highlighting the Zulu Layer, reduce the image & rotate the man to fit into the area where the horses head & neck were
6) Use the Background eraser tool to finely discard any unwanted areas from both layers
7) When satisfied with combined images - (Layer - Flatten Image ) and save to new file
Insert New Background
1) A suitable background is opened up in PS Elements 11
2) The new combined file is opened
3) Select the combined file and copy as 1) in Combining Images
4) The new background was selected and the combined file pasted into it to create a new layer (Edit - Paste)
5) Carry out the all the tasks previously described, moving the combined file to the desired location.
6) Flatted layers as 7) above and copy to new file
Note: I then had the man's torso inside the horses trunk, however, the Zulu was missing his upper arm, elbow and hand that was obviously holding the stick. Therefore:
Editing
1) The following parts of the Zulu were created by selecting the Clone Tool to make the image more realistic
Left arm, elbow and hand
Stick was extended to the left hand
fingers were created gripping the stick
Stick was lengthened and a point created
Zulu's hat was extended upwards
Stick held in right hand was extended and made to look like a bow
Horses hoof was created
2) The background was softened or sharpened where needed
3) All edges were smoothed using the Blur Tool
4) Image was magnified greatly and "spotted"
5) All edges were cleaned
